VitePress建站
创建项目
安装vitepress
shell
pnpm add -D vitepress初始化vitepress
shell
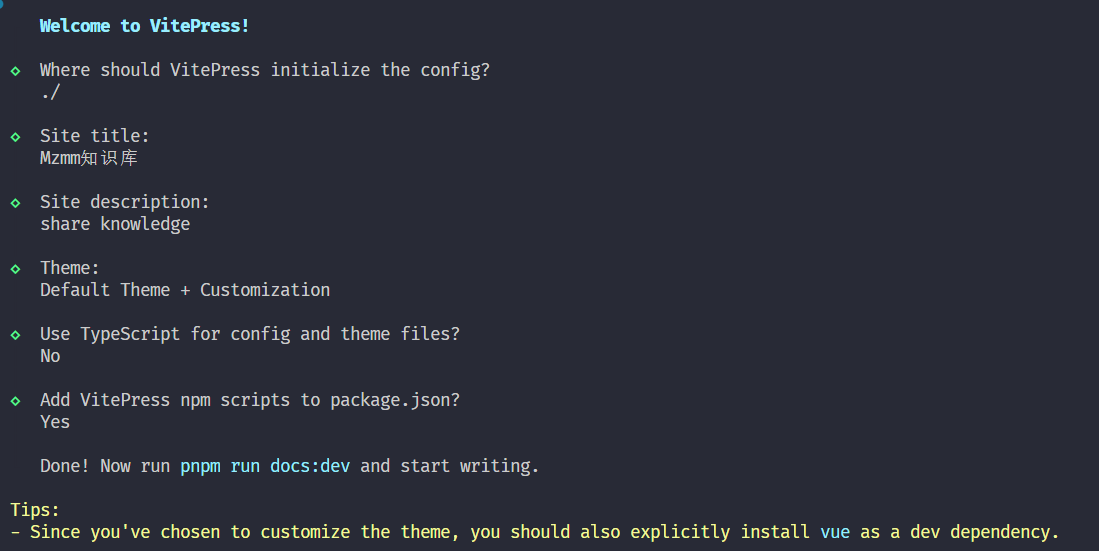
pnpm vitepress init然后做一些配置的选项
- 在当前根目录下创建vitepress项目
- 站点标题和描述。后续可以在配置中改
- 主题,建议选择第二个,好看
- 是否使用ts,因为是普通的静态站,所以个人觉得没必要ts
- 是否添加脚本到package.json,这个需要,启动命令,打包命令都得要用到
启动项目
shell
pnpm run docs:dev自定义配置
配置主页
主页一共有9个地方可以自定义
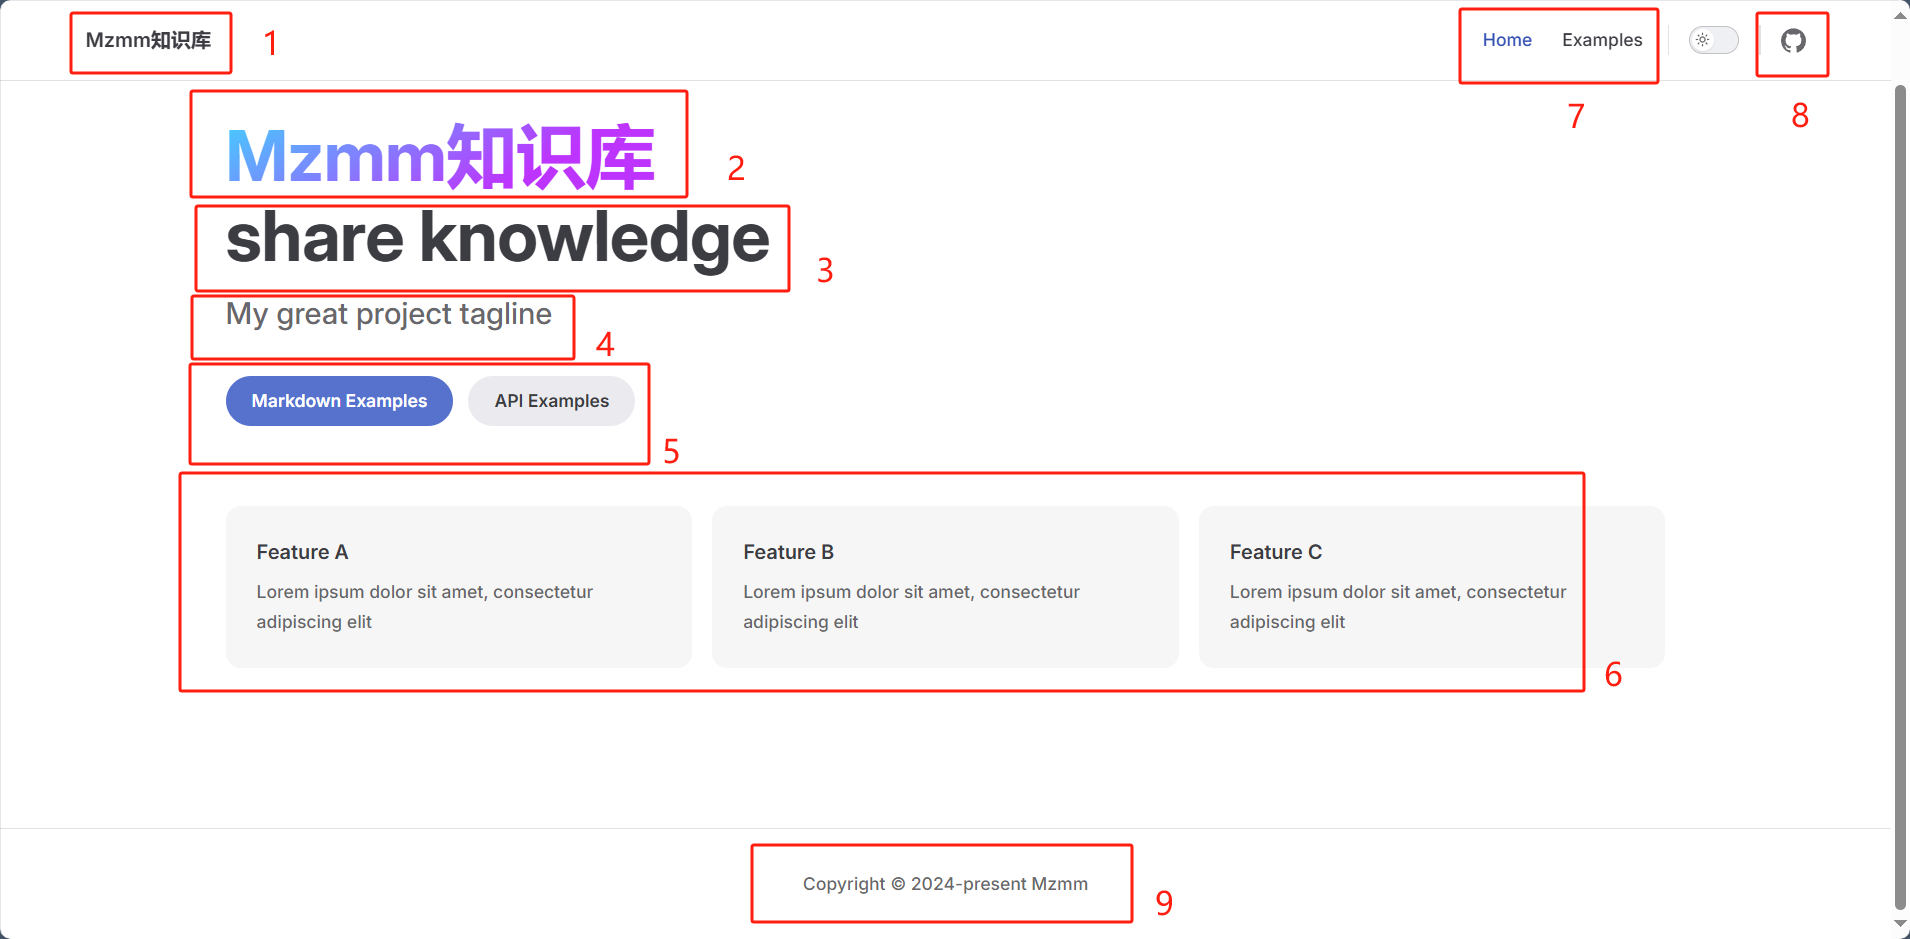
1、7、8这三个配置是在config.mjs中配置的 title <==> 1 nav <==> 7 socialLinks <==> 8
js
import { defineConfig } from 'vitepress'

// https://vitepress.dev/reference/site-config
export default defineConfig({
  // 对应的是上图中的1的位置
  title: "Mzmm知识库",
  description: "share knowledge",
  themeConfig: {
    // 这个logo是1位置的logo图标
    logo: '/logo.svg',

    // 这个是导航栏的对应的链接
    nav: [
      { text: 'Home', link: '/' },
      { text: 'Examples', link: '/markdown-examples' }
    ],

    // 文章的侧边栏(左侧边栏)
    sidebar: [
      {
        text: 'Examples',
        items: [
          { text: 'Markdown Examples', link: '/markdown-examples' },
          { text: 'Runtime API Examples', link: '/api-examples' }
        ]
      }
    ],

    // 友链
    socialLinks: [
      { icon: 'github', link: 'https://github.com/vuejs/vitepress' }
    ]
  }
})
2-6是在index.md文件中自定义的。对应关系是: name <==> 2 text <==> 3 tagline <==> 4 actions <==> 5 features <==> 6
5中的两个按钮是可以跳转的,link指定路径,比如/api-example就是在项目根目录下找api-example.md这个文件
yaml
---
# https://vitepress.dev/reference/default-theme-home-page
layout: home

hero:
  # 对应的2模块
  name: "Mzmm知识库"
  # 对应的3模块
  text: "分享技术知识"
  对应的4模块
  tagline: 我们不创造知识,我们知识知识的搬运工😉
  # 背景图
  image:
    src: /background.svg
    alt: 背景图片
  # 底下的两个按钮模块
  actions:
    - theme: brand
      text: 个人介绍
      link: /markdown-examples

# 这个是下面的三个特征
features:
  - title: Feature A
    details: Lorem ipsum dolor sit amet, consectetur adipiscing elit
  - title: Feature B
    details: Lorem ipsum dolor sit amet, consectetur adipiscing elit
  - title: Feature C
    details: Lorem ipsum dolor sit amet, consectetur adipiscing elit
---9是直接配置在.vitepress/config.mjs中的themeConfig对象中添加如下
js
footer: {
    copyright:"Copyright © 2024-present Mzmm"
}
配置文章页面
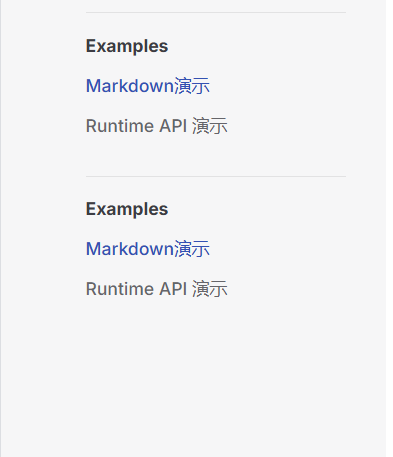
左侧边栏配置如下
js
sidebar: [
    {
        text: 'Examples',
        items: [
            { text: 'Markdown演示',link: '/markdown-examples' },
            { text: 'Runtime API 演示',link:'/api-examples' }
        ]
    },
    {
        text: 'Examples',
        items: [
            { text: 'Markdown演示',link: '/markdown-examples' },
            { text: 'Runtime API 演示',link:'/api-examples' }
        ]
    }
]
效果如下图所示:
自动识别侧边栏脚本
js
import path from "node:path";
import fs from "node:fs";

// 文件根目录
const DIR_PATH = path.resolve();
// 白名单,过滤不是文章的文件和文件夹
const WHITE_LIST = [
  "index.md",
  ".vitepress",
  "node_modules",
  ".idea",
  "assets",
];

// 判断是否是文件夹
const isDirectory = (path) => fs.lstatSync(path).isDirectory();

// 取差值
const intersections = (arr1, arr2) =>
  Array.from(new Set(arr1.filter((item) => !new Set(arr2).has(item))));

// 把方法导出直接使用
function getList(params, path1, pathname) {
  // 存放结果
  const res = [];
  // 开始遍历params
  for (let file in params) {
    // 拼接目录
    const dir = path.join(path1, params[file]);
    // 判断是否是文件夹
    const isDir = isDirectory(dir);
    if (isDir) {
      // 如果是文件夹,读取之后作为下一次递归参数
      const files = fs.readdirSync(dir);
      res.push({
        text: params[file],
        collapsible: true,
        items: getList(files, dir, `${pathname}/${params[file]}`),
      });
    } else {
      // 获取名字
      const name = path.basename(params[file]);
      // 排除非 md 文件
      const suffix = path.extname(params[file]);
      if (suffix !== ".md") {
        continue;
      }
      res.push({
        text: name,
        link: `${pathname}/${name}`,
      });
    }
  }
  // 对name做一下处理,把后缀删除
  res.map((item) => {
    item.text = item.text.replace(/\.md$/, "");
  });
  return res;
}

export const set_sidebar = (pathname) => {
  // 获取pathname的路径
  const dirPath = path.join(DIR_PATH, pathname);
  // 读取pathname下的所有文件或者文件夹
  const files = fs.readdirSync(dirPath);
  // 过滤掉
  const items = intersections(files, WHITE_LIST);
  // getList 函数后面会讲到
  return getList(items, dirPath, pathname);
};
自动识别侧边栏的sidebar配置
js
import { set_sidebar } from "../utils/auto-gen-sidebar.mjs";	// 改成自己的路径
sidebar: {
    "/web1/vue": set_sidebar("/web1/vue")
    "/web2/react": set_sidebar("/web2/react")
}右侧边栏默认是只识别1级标题的和最大的title默认是On this page,因此需要如下配置实现深度标题遍历以及title的自定义 还是在config.mjs文件进行配置
js
themeConfig: {
    outlineTitle: "文章目录",
    outline: "deep"  // 或者是[2,6]
}
文章页扩展
三遍栏改成两边栏 在config.mjs中的themeConfig配置对象中配置
js
sidebar: false, // 关闭侧边栏
aside: "left", // 设置右侧侧边栏在左侧显示在.vitepress/theme/style.css中配置css
css
/* 自定义侧边栏在最左边,右边撑满宽度 */
.VPDoc .container {
  margin: 0 !important;
}
@media (min-width: 960px) {
  .VPDoc:not(.has-sidebar) .content {
    max-width: 1552px !important;
  }
}
.VPDoc.has-aside .content-container {
  max-width: 1488px !important;
}
@media (min-width: 960px) {
  .VPDoc:not(.has-sidebar) .container {
    display: flex;
    justify-content: center;
    max-width: 1562px !important;
  }
}
.aside-container {
  position: fixed;
  top: 0;
  padding-top: calc(
    var(--vp-nav-height) + var(--vp-layout-top-height, 0px) +
      var(--vp-doc-top-height, 0px) + 10px
  ) !important;
  width: 224px;
  height: 100vh;
  overflow-x: hidden;
  overflow-y: auto;
  scrollbar-width: none;
}

/* 自定义h2的间距 */
.vp-doc h2 {
  margin: 0px 0 16px;
  padding-top: 24px;
  border: none;
}
美化地址栏icon
在 config.mjs defineConfig配置
js
head: [["link", {rel:"icon",href:"/logo.svg"}]],设置搜索框
在 config.mjs defineConfig配置
js
// 设置搜索框的样式
search:{
    provider: "local",
    options: {
        translations: {
            button: {
                buttonText: "搜索文档",
                buttonAriaLabel: "搜索文档",
            },
            modal: {
                noResultsText: "无法找到相关结果",
                resetButtonTitle: "清除查询条件",
                footer: {
                    selectText: "选择",
                    navigateText: "切换",
                },
            },
        },
    },
},
部署
github page
yaml
# 构建 VitePress 站点并将其部署到 GitHub Pages 的示例工作流程
#
name: Deploy VitePress site to Pages

on:
  # 在针对 `main` 分支的推送上运行。如果你
  # 使用 `master` 分支作为默认分支,请将其更改为 `master`
  push:
    branches: [main]

  # 允许你从 Actions 选项卡手动运行此工作流程
  workflow_dispatch:

# 设置 GITHUB_TOKEN 的权限,以允许部署到 GitHub Pages
permissions:
  contents: read
  pages: write
  id-token: write

# 只允许同时进行一次部署,跳过正在运行和最新队列之间的运行队列
# 但是,不要取消正在进行的运行,因为我们希望允许这些生产部署完成
concurrency:
  group: pages
  cancel-in-progress: false

jobs:
  # 构建工作
  build:
    runs-on: ubuntu-latest
    steps:
      - name: Checkout
        uses: actions/checkout@v4
        with:
          fetch-depth: 0 # 如果未启用 lastUpdated,则不需要
      - uses: pnpm/action-setup@v3 # 如果使用 pnpm,请取消注释
        with:
          version: 9
      # - uses: oven-sh/setup-bun@v1 # 如果使用 Bun,请取消注释
      - name: Setup Node
        uses: actions/setup-node@v4
        with:
          node-version: 20
          cache: pnpm # 或 pnpm / yarn
      - name: Setup Pages
        uses: actions/configure-pages@v4
      - name: Install dependencies
        run: pnpm install # 或 pnpm install / yarn install / bun install
      - name: Build with VitePress
        run: pnpm docs:build # 或 pnpm docs:build / yarn docs:build / bun run docs:build
      - name: Upload artifact
        uses: actions/upload-pages-artifact@v3
        with:
          path: ./.vitepress/dist

  # 部署工作
  deploy:
    environment:
      name: github-pages
      url: ${{ steps.deployment.outputs.page_url }}
    needs: build
    runs-on: ubuntu-latest
    name: Deploy
    steps:
      - name: Deploy to GitHub Pages
        id: deployment
        uses: actions/deploy-pages@v4