环境搭建
配置项
# 初始化git
git init
# 创建.gitignore文件(windows)
type nul > filename.txt # 这边直接手动创建就行
# 创建.gitignore文件(linux)
vim .gitignore
# 创建packages存放子包
mkdir packages
# 创建pnpm工作空间
# 这一步其实就是根目录创建一个pnpm-workspace.yaml文件,然后将packages:\n - "packages/*"写入文件中
# packages:
#   - "packages/*"
echo -e 'packages:\n - "packages/*"' > pnpm-workspace.yaml
# 初始化pnpm
pnpm init
# 切换目录到packages
cd packages
# 这里用到init.shell的脚本文件初始化(init.shell脚本内容如下)
./init.shell
install.shell
# 切换到packages目录创建必要的目录
mkdir components core docs hooks theme utils
# 遍历创建的必要目录,逐个初始化
for i in components core docs hooks theme utils; do
    # 切换到对应的目录
    cd $i
    # 初始化pnpm
    pnpm init
    # 返回上级目录
    cd ..

done
各个目录对应的功能
# 创建一个vue-ts的模板的vite的vue的项目,平时写组件看效果的地方
pnpm create vite play --template vue-ts
# 项目各个目录的作用
packages
├── components # 组件的逻辑代码
├── core       # pnpm包的入口
├── docs       # 项目文档
├── hooks      # 自定义的钩子(组合式api)
├── play       # 写组件看效果的地方
├── theme      # 样式
├── utils      # 工具函数
└── init.sh # 创建目录的脚本(用完就删除)// 修改各个包里面的packages的name
// 格式: `@easy-collective-ui/目录名`
// 只用core底下的用 `easy-collective-ui`
// core/package.json
{
"name": "@easy-collective-ui"
}
// components/package.json
{
"name": "@easy-collective-ui/components"
}
// docs/package.json
{
"name": "@easy-collective-ui/docs"
}
// hooks/package.json
{
"name": "@easy-collective-ui/hooks"
}
// theme/package.json
{
"name": "@easy-collective-ui/theme"
}
// utils/package.json
{
"name": "@easy-collective-ui/utils"
}
// play/package.json
{
"name": "@easy-collective-ui/play"
}
// 这样做可以避免和其他库重名去项目的根目录安装依赖
# 返回根目录
cd ..
# 安装开发依赖
pnpm add -Dw typescript@^5.2.2 vite@^5.1.4 vitest@^1.4.0 vue-tsc@^1.8.27 postcss-color-mix@^1.1.0 postcss-each@^1.1.0 postcss-each-variables@^0.3.0 postcss-for@^2.1.1 postcss-nested@^6.0.1 @types/node@^20.11.20 @types/lodash-es@^4.17.12 @vitejs/plugin-vue@^5.0.4 @vitejs/plugin-vue-jsx@^3.1.0 @vue/tsconfig@^0.5.1

# 安装非开发依赖
pnpm add -w lodash-es@^4.17.21 vue@^3.4.19
配置根目录的package.json文件
// 修改根目录底下的packages文件的name为@easy-collective-ui/workspace
{
    name:"@easy-collective-ui/workspace"
}
// 在dependencies中添加子包
"dependencies":{
    ...
    "easy-collective-ui": "workspace:*",
    "@easy-collective-ui/hooks": "workspace:*",
    "@easy-collective-ui/utils": "workspace:*",
    "@easy-collective-ui/theme": "workspace:*"
}# 安装子包依赖
# 这里--filter安装的是对应的后面的子包里面的依赖
pnpm add -D @vue/test-utils@2.4.5 @vitest/coverage-v8@^1.4.0 jsdom@^24.0.0 --filter @easy-collective-ui/components
pnpm add @popperjs/core@^2.11.8 async-validator@^4.2.5 --filter @easy-collective-ui/components// 在core的packages.json中添加如下
"dependencies":{
"@easy-collective-ui/components": "workspace:*"
}
// 因为core是pnpm包的入口文件
// 因此这里需要把core和components链接# docs依赖的是vitepress
pnpm add -D vitepress@1.0.0-rc.44 --filter @easy-collective-ui/docs
# 把play的packages.json文件对照根目录的packages.json文件进行裁剪,重复的依赖项可以直接删掉
# 然后把play目录底下的tsconfig.json和tsconfig.node.json删除(因为要在全局写一个tsconfig文件)
# 根目录创建tsconfig.json
touch tsconfig.json # 也可以图形化创建
touch tsconfig.node.json # 也可以图形化创建
# 添加postcss.config.json配置文件
touch postcss.config.cjs
# 在根目录进行node_moudles的安装
pnpm installtsconfig.json
{
  "extends": "@vue/tsconfig/tsconfig.dom.json",
  "compilerOptions": {
    "target": "ES2020",
    "useDefineForClassFields": true,
    "module": "ESNext",
    "lib": ["ES2020", "DOM", "DOM.Iterable"],
    "skipLibCheck": true,

    /* Bundler mode */
    "moduleResolution": "bundler",
    "allowImportingTsExtensions": true,
    "resolveJsonModule": true,
    "isolatedModules": true,
    "noEmit": true,
    "jsx": "preserve",
    "jsxImportSource": "vue",

    /* Linting */
    "strict": true,
    "noUnusedLocals": true,
    "noUnusedParameters": true,
    "noFallthroughCasesInSwitch": true
  },
  "include": ["packages/**/*.ts", "packages/**/*.tsx", "packages/**/*.vue"]
}
tsconfig.node.json
{
  "extends": "@tsconfig/node18/tsconfig.json",
  "include": ["packages/**/**.config.ts"],
  "compilerOptions": {
    "composite": true,
    "module": "ESNext",
    "moduleResolution": "Bundler",
    "types": ["node"]
  }
}
postcss.config.cjs
/* eslint-env node */
module.exports = {
  plugins: [
    require("postcss-nested"),
    require("postcss-each-variables"),
    require("postcss-each")({
      plugins: {
        beforeEach: [require("postcss-for"), require("postcss-color-mix")],
      },
    }),
  ],
};
.gitignore
# Logs
logs
*.log
npm-debug.log*
yarn-debug.log*
yarn-error.log*
pnpm-debug.log*
lerna-debug.log*

node_modules
coverage
dist
dist-ssr
*.local

/cyperss/videos/
/cypress/srceenshots/

.vitepress/dist
.vitepress/cache

# Editor directories and files
.vscode/*
!.vscode/extensions.json
.idea
.DS_Store
*.suo
*.ntvs*
*.njsproj
*.sln
*.sw?
测试代码
- 工具类(/package/util)
// 安装插件的工具函数封装(install.ts)

// 引入 Vue 中的 App 和 Plugin 类型,用于定义插件和应用实例的类型
import type { App,Plugin } from "vue"
// 从 lodash-es 库中引入 each 函数,用于遍历数组或对象。
import { each } from "lodash-es"

// 定义一个单文件组件类型SFCWithInstall,交叉类型(vue 插件类型和泛型的混合)
type SFCWithInstall<T> = T & Plugin

/**
 * 接受一个 Plugin 类型的数组 components,用于批量安装组件
 * @param componets
 * @returns
 */
// 定义一个导出函数 makeInstaller,接受一个 Plugin 类型的数组 components,用于批量安装组件。
export function makeInstaller(componets: Plugin[]){
    const installer = (app: App) => {
        // 使用 each 函数遍历 components 数组,将每个组件使用 app.use 方法进行安装。
        each(componets,(c) => app.use(c))
    }
    // 返回 installer 函数,作为插件。
    return installer as Plugin
}

/**
 * 接受一个泛型 T 的组件,用于给组件添加 install 方法,使其成为插件。
 * @param component
 * @returns
 */
// 定义一个导出函数 withInstall,接受一个泛型 T 的组件,用于给组件添加 install 方法,使其成为插件。
export const withInstall = <T>(component: T) => {
    // 给组件添加 install 方法,接受一个 App 类型的参数 app,用于将组件注册到应用实例中。
    (component as SFCWithInstall<T>).install = (app: App) => {
        // 获取组件的名称,并使用 app.component 方法将组件注册到应用实例中。
        const name = (component as any).name
        // 使用 app.component 方法将组件注册到应用实例中。
        app.component(name,component as Plugin)
    }
    // 返回组件,作为带有 install 方法的插件。
    return component as SFCWithInstall<T>
}


// 导出封装好的工具 index.ts
export * from "./install"- 测试组件(/packages/components)
<!-- /Button/Button.vue 测试的按钮组件 -->
<template>
    <button style="background: pink;">这是一个按钮</button>
</template>
<script setup lang="ts">
defineOptions({
    name:"EcButton"
})
</script>// /Button/index.ts 测试的按钮组件的入口文件
// 导入组件和暗转组件的工具函数
import Button from "./Button.vue"
import { withInstall } from "@easy-collective-ui/utils"
// 使用 withInstall 函数给组件添加 install 方法,使其成为插件。
export const EcButton = withInstall(Button)// index.ts
// 导出封装好的插件按钮组件
export * from './Button'- 入口文件(packages/core)
// commponents.ts 导入所有组件
import { EcButton } from "@easy-collective-ui/components";
import type { Plugin } from "vue";

// 定义一个数组,导出所有的插件组件到数组中默认导出
export default [EcButton] as Plugin[];


// index.ts 包入口文件
// 导入安装组件工具函数
import { makeInstaller } from "@easy-collective-ui/utils";
// 从组件文件夹导入组件
import commponents from "./commponents";
// 导入主题样式
import '@easy-collective-ui/theme/index.css';

// 使用 makeInstaller 函数批量安装组件
const installer = makeInstaller(commponents);

// 导出组件和安装器 这里默认导出安装器是为了在其他项目中调用的时候可以直接使用
export * from "@easy-collective-ui/components"
export default installer;- 主题样式(/packages/theme)
/* index.css */
/* 导入样式文件 */
@import "./reset.css"


/** reset.css */
body {
  font-family: var(--er-font-family);
  font-weight: 400;
  font-size: var(--er-font-size-base);
  line-height: calc(var(--er-font-size-base) * 1.2);
  color: var(--er-text-color-primary);
  -webkit-font-smoothing: antialiased;
  -moz-osx-font-smoothing: grayscale;
  -webkit-tap-highlight-color: transparent;
}

a {
  color: var(--er-color-primary);
  text-decoration: none;

  &:hover,
  &:focus {
    color: var(--er-color-primary-light-3);
  }

  &:active {
    color: var(--er-color-primary-dark-2);
  }
}

h1,
h2,
h3,
h4,
h5,
h6 {
  color: var(--er-text-color-regular);
  font-weight: inherit;

  &:first-child {
    margin-top: 0;
  }

  &:last-child {
    margin-bottom: 0;
  }
}

h1 {
  font-size: calc(var(--er-font-size-base) + 6px);
}

h2 {
  font-size: calc(var(--er-font-size-base) + 4px);
}

h3 {
  font-size: calc(var(--er-font-size-base) + 2px);
}

h4,
h5,
h6,
p {
  font-size: inherit;
}

p {
  line-height: 1.8;

  &:first-child {
    margin-top: 0;
  }

  &:last-child {
    margin-bottom: 0;
  }
}

sup,
sub {
  font-size: calc(var(--er-font-size-base) - 1px);
}

small {
  font-size: calc(var(--er-font-size-base) - 2px);
}

hr {
  margin-top: 20px;
  margin-bottom: 20px;
  border: 0;
  border-top: 1px solid var(--er-border-color-lighter);
}/** package.json */
{
"name": "@easy-collective-ui/theme",
"version": "1.0.0",
"description": "",
"main": "index.css", //修改这里把index.css作为入口文件
"scripts": {
"test": "echo \"Error: no test specified\" && exit 1"
},
"keywords": [],
"author": "",
"license": "ISC"
}- 测试案例(/packages/play)
// main.ts 测试的vite项目的入口文件,这里注册我们写的组件看是否成功写对
import { createApp } from 'vue'
import './style.css'
import App from './App.vue'
import EasyCollectivUI from 'easy-collective-ui'


createApp(App).use(EasyCollectivUI).mount('#app')
文档
创建文档
# 到package/docs的目录中使用初始化命令
cd /packages/docs
npx vitepress init修改最外层的package.json
{
  "scripts": {
    "dev": "pnpm --filter @toy-element/play dev",
    "docs:dev": "pnpm --filter @toy-element/docs dev",
    "docs:build": "pnpm --filter @toy-element/docs build",
    "test": "echo 'hello world'"
  }
}
创建一个 .github/workflows/test-and-deploy.yml 文件,内容如下
name: Test and deploy

on:
  push:
    branches:
      - master

jobs:
  test:
    name: Run Lint and Test
    runs-on: ubuntu-latest

    steps:
      - name: Checkout repo
        uses: actions/checkout@v3

      - name: Setup Node
        uses: actions/setup-node@v3

      - name: Install pnpm
        run: npm install -g pnpm

      - name: Install dependencies
        run: pnpm install --frozen-lockfile

      - name: Run tests
        run: npm run test

  build:
    name: Build docs
    runs-on: ubuntu-latest
    needs: test

    steps:
      - name: Checkout repo
        uses: actions/checkout@v3

      - name: Setup Node
        uses: actions/setup-node@v3

      - name: Install pnpm
        run: npm install -g pnpm

      - name: Install dependencies
        run: pnpm install --frozen-lockfile

      - name: Build docs
        run: npm run docs:build

      - name: Upload docs
        uses: actions/upload-artifact@v3
        with:
          name: docs
          path: ./packages/docs/.vitepress/dist

  deploy:
    name: Deploy to GitHub Pages
    runs-on: ubuntu-latest
    needs: build
    steps:
      - name: Download docs
        uses: actions/download-artifact@v3
        with:
          name: docs

      - name: Deploy to GitHub Pages
        uses: peaceiris/actions-gh-pages@v3
        with:
          github_token: ${{ secrets.GH_TOKEN }}
publish_dir: .上面的secrets.GH_TOKEN去github创建,然后放到仓库里的配装项中,下次在推送代码的时候会自动部署
打包发布项目
打包项目
这里打包分为两种版本一种是umd,一种是es。
- 打包完成别人在用我们的组件库的时候没有类型提示,因此我们还要安装一个vite的插件,在core目录底下安装即可
pnpm add vite-plugin-dts@3.9.1 -D- 在入口文件夹也就是core文件夹中创建一个
vite.umd.config.ts因为我们这里打包用的是vite
import { defineConfig } from 'vite'
import vue from "@vitejs/plugin-vue"
import { resolve } from 'path'

export default defineConfig({
    plugins: [vue()],
    // 打包构建
    build: {
        // 输出目录
        outDir: "dist/umd",
        // 库模式
        lib:{
            // 入口文件
            entry: resolve(__dirname, "./index.ts"),
            // 打包项目名称
            name: "EasyCollectiveUI",
            fileName: "index",
            formats: ['umd']
        },
        rollupOptions: {
            external: ['vue'],
            output: {
                exports: 'named',
                globals: {
                    vue: 'Vue',
                },
                assetFileNames: (assetInfo) => {
                    if(assetInfo.name === "style.css") return "index.css";
                    return assetInfo.name as string;
                }
            },
        }
    }
})- 因为我们预期是要把ts的一些类型文件全部分开放到types文件下,且要求core/hooks/components/utils目录下的ts文件支持类型判断,因此在根目录下创建
tsconfig.build.config文件
{
    "extends": "@vue/tsconfig/tsconfig.dom.json",
    "compilerOptions": {
        "target": "ES2020",
        "useDefineForClassFields": true,
        "module": "ESNext",
        "lib": ["ES2020", "DOM", "DOM.Iterable"],
        "skipLibCheck": true,

      /* Bundler mode */
        "moduleResolution": "bundler",
        "allowImportingTsExtensions": true,
        "resolveJsonModule": true,
        "isolatedModules": true,
        "noEmit": true,
        "jsx": "preserve",
        "jsxImportSource": "vue",

      /* Linting */
        "strict": true,
        "noUnusedLocals": true,
        "noUnusedParameters": true,
        "noFallthroughCasesInSwitch": true
    },
    "include": [
        "packages/core/index.ts",
        "packages/hooks/**/*.ts",
        "packages/utils/**/*.ts",
        "packages/components/index.ts",
        "packages/components/**/*.ts",
        "packages/components/**/*.vue"
    ]
}- core文件夹下的
vite.es.config.ts文件如下,这里因为要类型判断引入插件dts以及tsconfig.build.config文件做打包的类型文件控制:
import { defineConfig } from 'vite'
import vue from "@vitejs/plugin-vue"
import { resolve } from 'path'
import dts from 'vite-plugin-dts'

export default defineConfig({
    plugins: [vue(),dts({
        tsconfigPath: "../../tsconfig.build.json",
        outDir: "dist/types"
    })],
    // 打包构建
    build: {
        // 输出目录
        outDir: "dist/umd",
        // 库模式
        lib:{
            // 入口文件
            entry: resolve(__dirname, "./index.ts"),
            // 打包项目名称
            name: "EasyCollectiveUI",
            fileName: "index",
            formats: ['es']
        },
        rollupOptions: {
            external: [
                'vue',
                "@fortawesome/fontawesome-svg-core",
                "@fortawesome/free-solid-svg-icons",
                "@fortawesome/vue-fontawesome",
                "@popperjs/core",
                "async-validator"
            ],
            output: {
                assetFileNames: (assetInfo) => {
                    if(assetInfo.name === "style.css") return "index.css";
                    return assetInfo.name as string;
                }
            },
        }
    }
})- 对应的入口文件夹下的package.json文件如下
{
  "name": "easy-collective-ui",
  "version": "1.0.0",
  "description": "",
  "type": "module",
  "main": "index.js",
  "scripts": {
    "build-umd": "vite build --config vite.umd.config.ts",
    "build-es": "vite build --config vite.es.config.ts"
  },
  "keywords": [],
  "dependencies":{
    "@easy-collective-ui/components": "workspace:*"
  },
  "author": "",
  "license": "ISC"
}- 现在对于es来说分包还是不是很理想,因为组件会有很多种以及还有一些工具类型和hooks,因此这里做一个分包
import { defineConfig } from 'vite'
import vue from "@vitejs/plugin-vue"
import { resolve } from 'path'
import dts from 'vite-plugin-dts'

// 这里是所有组件名称的数组
const COMP_NAMES = [
    "Alert",
    "Button",
    "Collapse",
    "Dropdown",
    "Form",
    "Icon",
    "Input",
    "Loading",
    "Message",
    "MessageBox",
    "Notification",
    "Overlay",
    "Popconfirm",
    "Select",
    "Switch",
    "Tooltip",
    "Uplaod",
] as const;


export default defineConfig({
    plugins: [vue(),dts({
        tsconfigPath: "../../tsconfig.build.json",
        outDir: "dist/types"
    })],
    // 打包构建
    build: {
        // 输出目录
        outDir: "dist/es",
        // 库模式
        lib:{
            // 入口文件
            entry: resolve(__dirname, "./index.ts"),
            // 打包项目名称
            name: "EasyCollectiveUI",
            fileName: "index",
            formats: ['es']
        },
        rollupOptions: {
            external: [
                'vue',
                "@fortawesome/fontawesome-svg-core",
                "@fortawesome/free-solid-svg-icons",
                "@fortawesome/vue-fontawesome",
                "@popperjs/core",
                "async-validator"
            ],
            output: {
                assetFileNames: (assetInfo) => {
                    if(assetInfo.name === "style.css") return "index.css";
                    return assetInfo.name as string;
                },

                // 这里做了一个分包,按照目录以及组件名称进行的分包
                manualChunks(id){
                    if(id.includes('node_modules')){
                        return "vendor"
                    }
                    if(id.includes("packages/hooks")){
                        return "hooks"
                    }
                    if(id.includes("packages/utils")){
                        return "utils"
                    }
                    for (const item of COMP_NAMES) {
                        if(id.includes(`packages/components/${item}`)){
                            return item
                        }
                    }
                }
            },
        }
    }
})- 分包完以后接着我们要把css样式文件单独放到一个文件家里,这个时候就要一个库
pnpm add move-file-cli@^3.0.0 -Dw- 然后再
core/packages.json文件中添加新的执行脚本
"script": {
  "move-style": "move-file dist/es/index.css dist/index.css"
}- 由于我们要串联这些npm的script,所以这个时候需要另外一个包
pnpm add npm-run-all@^4.1.5 -Dw- 然后再
core/packages.json文件中添加新的执行脚本
// 这里的run-s是串联,run-p是并联

"script": {
  "build": "run-s build-only move-style",
  "build-only": "run-p build-es build-umd"
}
npm包的发布
关于npm发的开发体验
- 关于npm的源管理器,nrm
# 和nvm类似,nrm也是一个npm源管理器
# 查看当前npm源
nrm ls
# 使用npm官方源
# 在进行npm发部的时候,要使用官方源
nrm use npm- 登录npm账号
npm login
# 到网页进行登录验证
npm whoami
# 查看当前是否登录,登录的账户是谁- 这里还要推荐一个包,rimraf,这是一个删除文件的工具
# 添加项目依赖
pnpm add rimraf -Dw
# 在package.json中添加
"clean": "rimraf dist"

# 在项目打包前先清理之前的打包文件
"build": "run-s clean build-only move-style",- 关于包的发部,这里推荐release-it,这是一个发布工具
pnpm add release-it -Dw

# 在package.json中添加
"release": "release-it"

# 发布
npm run release
# 选择版本号然后同意即可
# 在发布前要进行打包
# 后续的打包在根目录进行完成即可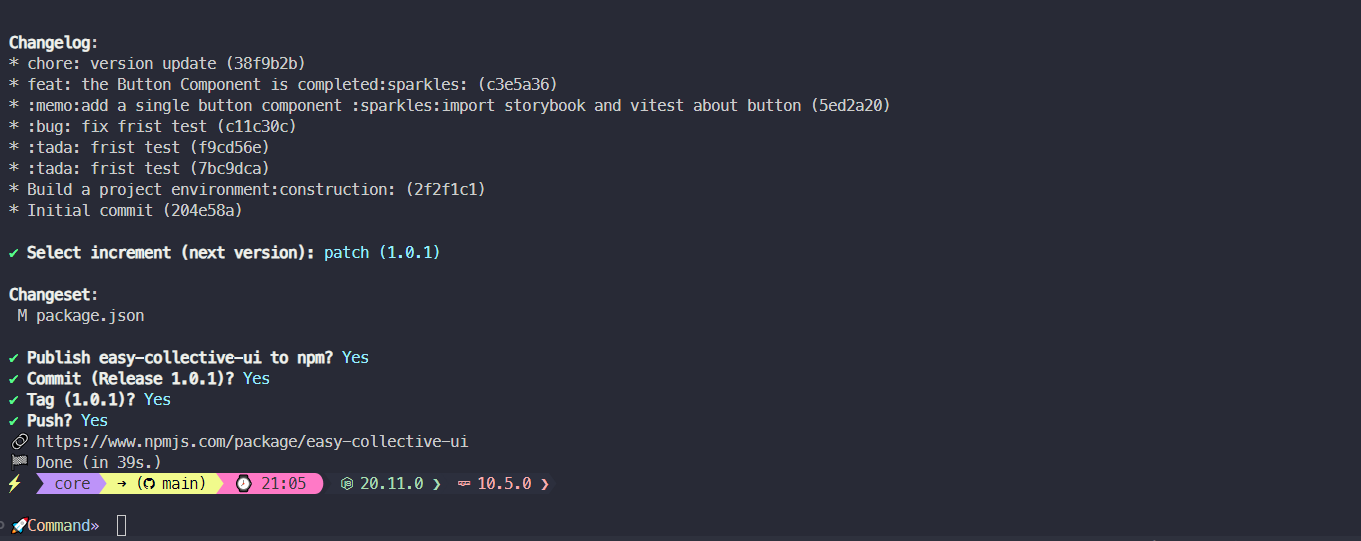
语义化版本号的三个部分
在语义化版本控制(Sematic Versioning, 简称SemVer)中,版本号主要由三个部分组成:主版本号(MAJOR)、次版本号(MINOR)和修订号(PATCH),格式为:主本号.次版本号.修订号
主版本号(MAJOR)
- 当你兼容的API修改时,增加主版本号
- 这表示该版本包含了重大更改,使用此新版本的用户需要对代码进行响应修改
次版本号(MINOR)
- 当你添加向下兼容的功能时,增加次版本号
- 意味着型版本添加了新功能,但是现有api保持不变,因此使用型版本用户不需要修改代码
修订号(PATCH)
- 当你做了向下兼容的问题修正时,新增修订号
- 这表示新版本修复了一些问题,但并没有引入新功能,使用此版本的用户可以期望获得更稳定的体验
与发布版本标识符
- 可以附加一个预发布版本标识符(如:
alpha,beta,rc等)来标识开发中的版本,通常用于测试阶段
- 可以附加一个预发布版本标识符(如:
构建元数据
- 可以用于提供有关构建的附加信息,如构建时间或构建系统信息
打包的二次优化
css的分包处理
- 再core的
vite.es.config.ts文件中添加新的配置参数cssCodeSplit,我们在用库模式的时候,这个参数默认是false
ts// build打包的时候将cssCodeSplit设置为true build: { outDir: "dist/es", cssCodeSplit: true, lib:{ entry: resolve(__dirname, "./index.ts"), name: "EasyCollectiveUI", fileName: "index", formats: ['es'] }, rollupOptions: { external: [ 'vue', "@fortawesome/fontawesome-svg-core", "@fortawesome/free-solid-svg-icons", "@fortawesome/vue-fontawesome", "@popperjs/core", "async-validator" ], output: { assetFileNames: (assetInfo) => { if(assetInfo.name === "style.css") return "index.css"; // 在这里加上一个判断,如果是css文件就单独打包到theme文件夹下 if( assetInfo.type === "asset" && /\.(css)$/i.test(assetInfo.name as string) ){ return 'theme/[name].[ext]' } return assetInfo.name as string; }, manualChunks(id){ if(id.includes('node_modules')){ return "vendor" } if(id.includes("packages/hooks")){ return "hooks" } if(id.includes("packages/utils")){ return "utils" } for (const item of getDirectoriesSync("../components")) { if(id.includes(`packages/components/${item}`)){ return item } } }, }, } }- 这里我们还要删除core原来
package.json中的build行为中的move-style动作,因为我们已经在vite.es.config.ts中做了css的分包处理,然后进行打包发现打包后的css文件的theme目录在es目录下。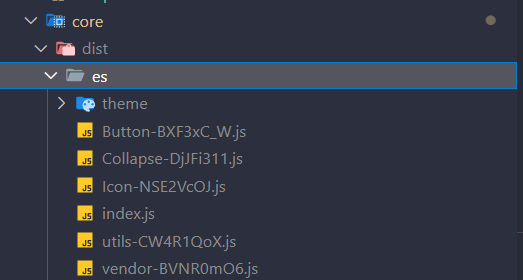
因此我们需要把theme目录移除和es同级 我们在core目录下自定义一个插件 这里我们手动实现清除上次打包的产物和移动css文件到theme目录的动作,所以我们把
core/package.json中的clean和move-style动作删除ts// 这个插件实际上就用到了两个生命周期, // 在vite的自定义插件中一般有两种生命周期,vite独有的钩子和通用钩子(一般就是rollup的钩子) // 这个插件是想在打包的时候把上一次打包的css分割出去的产物删除,然后在打包结束的时候把打包后的产物移动到指定目录 // 所以这里用到了通用钩子buildStart和buildEnd import {each,isFunction} from 'lodash-es' import shell from 'shelljs' export default function hooksPlugin({ rmFiles = [], beforeBuild, afterBuild, }:{ rmFiles?:string[]; beforeBuild?:Function; afterBuild?:Function; }){ return { // 插件的名字 name: 'hooks-plugin', buildStart(){ each(rmFiles,(fName) => shell.rm("-rf",fName)); isFunction(beforeBuild) && beforeBuild(); }, buildEnd(err?:Error){ !err && isFunction(afterBuild) && afterBuild(); } } }然后分别在
core/vite.es.config.ts和core/vite.umd.config.ts中注册插件。ts// es const TRY_MOVE_STYLES_DELAY = 800 as const function moveStyles(){ try{ readdirSync('./dist/es/theme') shell.mv("./dist/es/theme","./dist") }catch(_){ delay(moveStyles,TRY_MOVE_STYLES_DELAY) } } export default defineConfig({ plugins: [ vue(), dts({ tsconfigPath: "../../tsconfig.build.json", outDir: "dist/types" }), hooks({ rmFiles:['./dist/es','./dist/theme','./dist/types'], afterBuild: moveStyles }) ], ... }) // umd const TRY_MOVE_STYLES_DELAY = 800 as const function moveStyles(){ try{ readFileSync('./dist/umd/index.css.gz') shell.cp("./dist/umd/index.css","./dist/index.css") }catch(_){ delay(moveStyles,TRY_MOVE_STYLES_DELAY) } } export default defineConfig({ plugins: [ vue(), compression({ include: /.(cjs|css)$/i, }), hooks({ rmFiles:["./dist/umd","./dist/index.css"], afterBuild: moveStyles, }) ], ... })把umd模式打包的文件进行压缩
shell# 切换到core目录 cd packages/core # 安装一个vite的插件 pnpm add vite-plugin-compression2 -D
在
core/vite.umd.config.ts中添加插件tsimport { defineConfig } from 'vite' import vue from "@vitejs/plugin-vue" import { resolve } from 'path' // 新增压缩插件 import { compression } from "vite-plugin-compression2" export default defineConfig({ plugins: [ vue(), // 新增压缩插件配置,这里只对cjs和css文件进行压缩 compression({ include: /.(cjs|css)$/i, }) ], // 打包构建 build: { // 输出目录 outDir: "dist/umd", // 库模式 lib:{ // 入口文件 entry: resolve(__dirname, "./index.ts"), // 打包项目名称 name: "EasyCollectiveUI", fileName: "index", formats: ['umd'] }, rollupOptions: { external: ['vue'], output: { exports: 'named', globals: { vue: 'Vue', }, assetFileNames: (assetInfo) => { if(assetInfo.name === "style.css") return "index.css"; return assetInfo.name as string; } }, } } })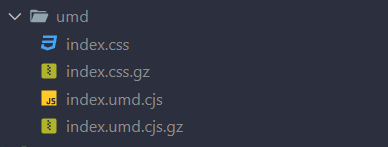
后续使用就是把压缩包上传到cdn上进行后续工作和优化。
- 再core的
打包遗留的问题
- Icon组件打包后,css样式由于是封装的,我们同时使用了样式隔离scoped,在进行打包以后由于打包后的代码会共用一段导出sfc的代码,我们可以把这段代码单独打包出来然后进行引用
tsconst _export_sfc = (sfc,props) => { const target = sfc.__vccOpts || sfc; for (const [key, val] of props) { target[key] = val; } return target; } export { _export_sfc as _ }- 上述代码就是各个组件共用的导出代码,我们单独打包这段代码然后进行引用。(这里我是把这个打包以后的代码合并到了utils.ts的文件中,然后进行引用)
对于
vite.es.config.ts文件进行改造tsmanualChunks(id){ if(id.includes('node_modules')){ return "vendor" } if(id.includes("packages/hooks")){ return "hooks" } if(id.includes("packages/utils")){ return "utils" } for (const item of getDirectoriesSync("../components")) { if(id.includes(`packages/components/${item}`)){ return item } } // 我们这里不妨输出一下id除了上面的if判断以外还有哪些id没有被命中 console.log(id) }通过运行打包命令后上面就会得到没有被命中的id,这个id就是我们上面提到的导出代码,我们把它单独打包出来,得到id为
plugin-vue:export-helper然后我们修改
vite.es.config.ts文件,对id为plugin-vue:export-helper进行命中然后打包合并/packages/utils的分支中
tsif(id.includes("packages/utils") || id.includes("plugin-vue:export-helper")){ return "utils" }代码的混淆和条件编译
- 获取到terser的插件(因为涉及到条件编译,因此这里需要使用插件进行打包,而不是直接在vite.config.js中进行配置)
shell# 切换到core目录 pnpm add terser @rollup/plugin-terser -D- 在
vite.es.config.ts文件中进行配置
tsimport { defineConfig } from 'vite' import vue from "@vitejs/plugin-vue" import { resolve } from 'path' import dts from 'vite-plugin-dts' import { map, filter, delay } from "lodash-es"; import { readdirSync } from 'fs' import shell from 'shelljs' import hooks from './hooksPlugin'; import terser from '@rollup/plugin-terser' // const COMP_NAMES = [ // "Alert", // "Button", // "Collapse", // "Dropdown", // "Form", // "Icon", // "Input", // "Loading", // "Message", // "MessageBox", // "Notification", // "Overlay", // "Popconfirm", // "Select", // "Switch", // "Tooltip", // "Uplaod", // ] as const; const TRY_MOVE_STYLES_DELAY = 800 as const // 定义三个环境 const isProd = process.env.NODE_ENV === 'production'; const isDev = process.env.NODE_ENV === 'development'; const isTest = process.env.NODE_ENV === 'test'; // 读取指定目录下的所有目录名称 function getDirectoriesSync(basePath: string) { const entires = readdirSync(basePath, { withFileTypes: true }); return map( filter(entires,(entry) => entry.isDirectory()), (entry) => entry.name ) } function moveStyles(){ try{ readdirSync('./dist/es/theme') shell.mv("./dist/es/theme","./dist") }catch(_){ delay(moveStyles,TRY_MOVE_STYLES_DELAY) } } export default defineConfig({ plugins: [ vue(), dts({ tsconfigPath: "../../tsconfig.build.json", outDir: "dist/types" }), hooks({ rmFiles:['./dist/es','./dist/theme','./dist/types'], afterBuild: moveStyles }), terser({ // 压缩相关的 compress: { // 生产环境下开启分号 sequences: isProd, // 生产环境下参数重命名 arguments: isProd, // 生产环境下移除console drop_console: isProd && ["log"], // 生产环境下移除debugger drop_debugger: isProd, // 生产环境下压缩的次数为4次,非生产环境则为1次 passes: isProd ? 4 : 1, // 全局的定义变量,用于条件编译 global_defs:{ "@DEV": JSON.stringify(isDev), "@TEST": JSON.stringify(isTest), "@PROD": JSON.stringify(isProd) }, }, // 格式化相关的 format: { semicolons: false, shorthand: isProd, braces: !isProd, beautify: !isProd, comments: !isProd, }, // 代码混淆相关的 mangle: { // 根级顶层变量做一次丑化 toplevel: isProd, // 函数内部变量丑化 eval: isProd, // 保留类名 keep_classnames: isDev, // 保留函数名 keep_fnames: isDev, } }) ], // 打包构建 build: { // 输出目录 outDir: "dist/es", // css代码分割 cssCodeSplit: true, // minify: false, // 库模式 lib:{ // 入口文件 entry: resolve(__dirname, "./index.ts"), // 打包项目名称 name: "EasyCollectiveUI", fileName: "index", formats: ['es'] }, rollupOptions: { external: [ 'vue', "@fortawesome/fontawesome-svg-core", "@fortawesome/free-solid-svg-icons", "@fortawesome/vue-fontawesome", "@popperjs/core", "async-validator" ], output: { assetFileNames: (assetInfo) => { if(assetInfo.name === "style.css") return "index.css"; if( assetInfo.type === "asset" && /\.(css)$/i.test(assetInfo.name as string) ){ return 'theme/[name].[ext]' } return assetInfo.name as string; }, manualChunks(id){ if(id.includes('node_modules')){ return "vendor" } if(id.includes("packages/hooks")){ return "hooks" } if(id.includes("packages/utils") || id.includes("plugin-vue:export-helper")){ return "utils" } for (const item of getDirectoriesSync("../components")) { if(id.includes(`packages/components/${item}`)){ return item } } }, }, } } }- 在
vite.umd.config.ts进行配置
tsimport { defineConfig } from 'vite' import vue from "@vitejs/plugin-vue" import { resolve } from 'path' import { compression } from "vite-plugin-compression2" import { readFileSync } from "fs" import shell from "shelljs" import {delay} from "lodash-es" import hooks from './hooksPlugin' import terser from '@rollup/plugin-terser' const TRY_MOVE_STYLES_DELAY = 800 as const // 定义三个环境 const isProd = process.env.NODE_ENV === 'production'; const isDev = process.env.NODE_ENV === 'development'; const isTest = process.env.NODE_ENV === 'test'; function moveStyles(){ try{ readFileSync('./dist/umd/index.css.gz') shell.cp("./dist/umd/index.css","./dist/index.css") }catch(_){ delay(moveStyles,TRY_MOVE_STYLES_DELAY) } } export default defineConfig({ plugins: [ vue(), compression({ include: /.(cjs|css)$/i, }), terser({ compress: { drop_console: ["log"], drop_debugger: true, passes: 3, global_defs:{ "@DEV": JSON.stringify(isDev), "@TEST": JSON.stringify(isTest), "@PROD": JSON.stringify(isProd) }, }, }), hooks({ rmFiles:["./dist/umd","./dist/index.css"], afterBuild: moveStyles, }) ], // 打包构建 build: { // 输出目录 outDir: "dist/umd", // 库模式 lib:{ // 入口文件 entry: resolve(__dirname, "./index.ts"), // 打包项目名称 name: "EasyCollectiveUI", fileName: "index", formats: ['umd'] }, rollupOptions: { external: ['vue'], output: { exports: 'named', globals: { vue: 'Vue', }, assetFileNames: (assetInfo) => { if(assetInfo.name === "style.css") return "index.css"; return assetInfo.name as string; } }, } } })- 安装cross-env到根目录
shellpnpm add cross-env -Dw在
packages/core目录下创建ts文件用于条件编译,这里我以打印logo为例,即printLogo.tstsexport default function () { // 如果是生产环境 if(PROD) { const logo = ` ------------------------------------- _______ ______ _______ _______ | ___|| || | ||_ _| | ___|| ---|| | | _| |_ |_______||______||_______||_______| ------------------------------------- author: Mzmm403 ` const rainbowGradient = ` background: linear-gradient(135deg, orange 60%, cyan); background-clip: text; color: transparent; font-size: 16px; line-height: 1; font-family: monospace; font-weight: 700; ` console.log(`%c${logo}`, rainbowGradient) }else if(DEV){ // 开发环境 console.log("[EasyCollectiveUI]: dev mode...") } }可以去
patorjk.com生成对应的logo- 在根目录下添加
env.d.ts文件
tsdeclare const PROD: boolean declare const DEV: boolean declare const TEST: boolean- 在根目录的
tsconfig.json和tsconfig.build.json中添加
json"include": [ // 新增文件路径包含全局环境变量配置文件 "env.d.ts", "pckages/**/**/*.ts", "packages/**/*.ts", "packages/**/*.tsx", "packages/**/*.vue" ]我们在vitest测试的时候还需要配置一下,在
vitest.config.ts中添加tsexport default defineConfig({ plugins: [vue(), vueJsx()], // 新增的地方 define: { DEV: JSON.stringify(false), TEST: JSON.stringify(false), PROD: JSON.stringify(true) }, test: { globals: true, environment: 'jsdom', } })然后我们配置最外层的
package.jsonjson"scripts": { "dev": "pnpm run build && pnpm --filter @easy-collective-ui/play dev", "story": "pnpm run build && pnpm --filter @easy-collective-ui/play storybook", "docs:dev": "pnpm --filter @easy-collective-ui/docs dev", "docs:build": "pnpm --filter @easy-collective-ui/docs build", "test": "cross-env NODE_ENV=test pnpm --filter @easy-collective-ui/components test", "build": "cross-env NODE_ENV=production pnpm --filter easy-collective-ui build", "build:dev": "cross-env NODE_ENV=development pnpm --filter easy-collective-ui build:watch" }然后我们更改一下
packages/core下的package.jsonjson"scripts": { "build": "run-p build-es build-umd", "build:watch":"run-p build-es:watch build-umd:watch", "build-umd": "vite build --config vite.umd.config.ts", "build-es": "vite build --config vite.es.config.ts", "build-umd:watch": "vite build --watch --config vite.umd.config.ts", "build-es:watch": "vite build --watch --config vite.es.config.ts", "release": "release-it" },最后再在
packages/core下的index.ts文件中引入printLogo.tstsimport printLogo from "./printLogo" printLogo()- 如果你想你可以对css进行混淆,因为我们在做打包配置的时候关闭了混合模式,因此我们可以通过以下方式进行css的混淆
首先下载
cssnano插件shellpnpm install cssnano -Dw然后我们对于根目录下的
postcss.config.cjs文件进行插件注册cjs/* eslint-env node */ module.exports = { plugins: [ require("postcss-nested"), require("postcss-each-variables"), require("postcss-each")({ plugins: { beforeEach: [require("postcss-for"), require("postcss-color-mix")], }, }), // 引入cssnano插件开启css混淆功能 require("cssnano")({ preset: "default" }) ], };
至此,打包的一些事项基本完成,最后打包的目录如下 
这里我们不经可以全局引入css还可以按需引入 比如我们这里对于storybook的配置而言我们可以按下方图中按需引入
首先引入css全局变量 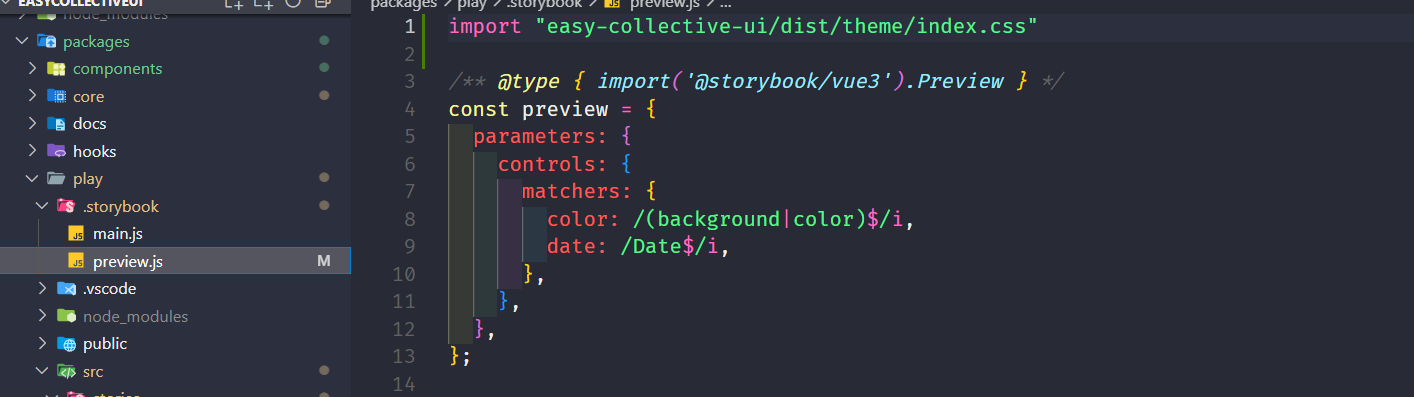 然后按需引入组件样式文件
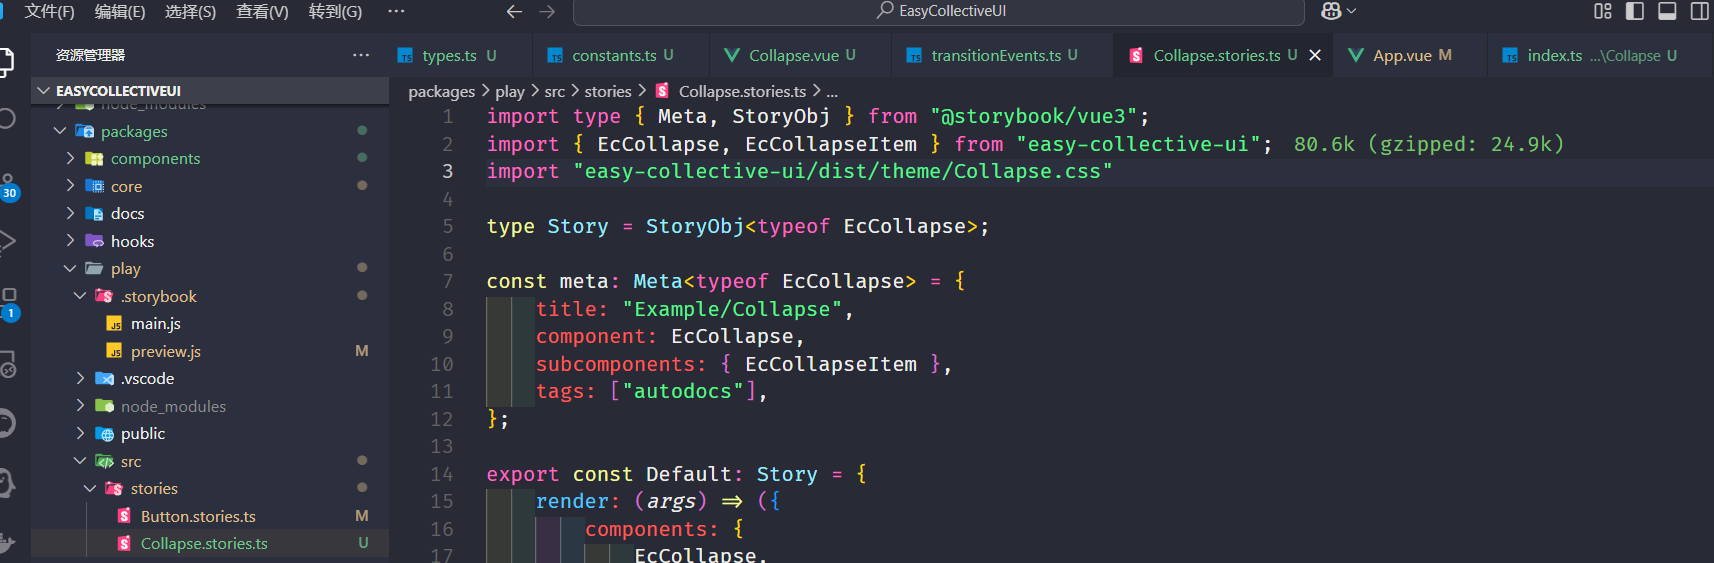
项目文档
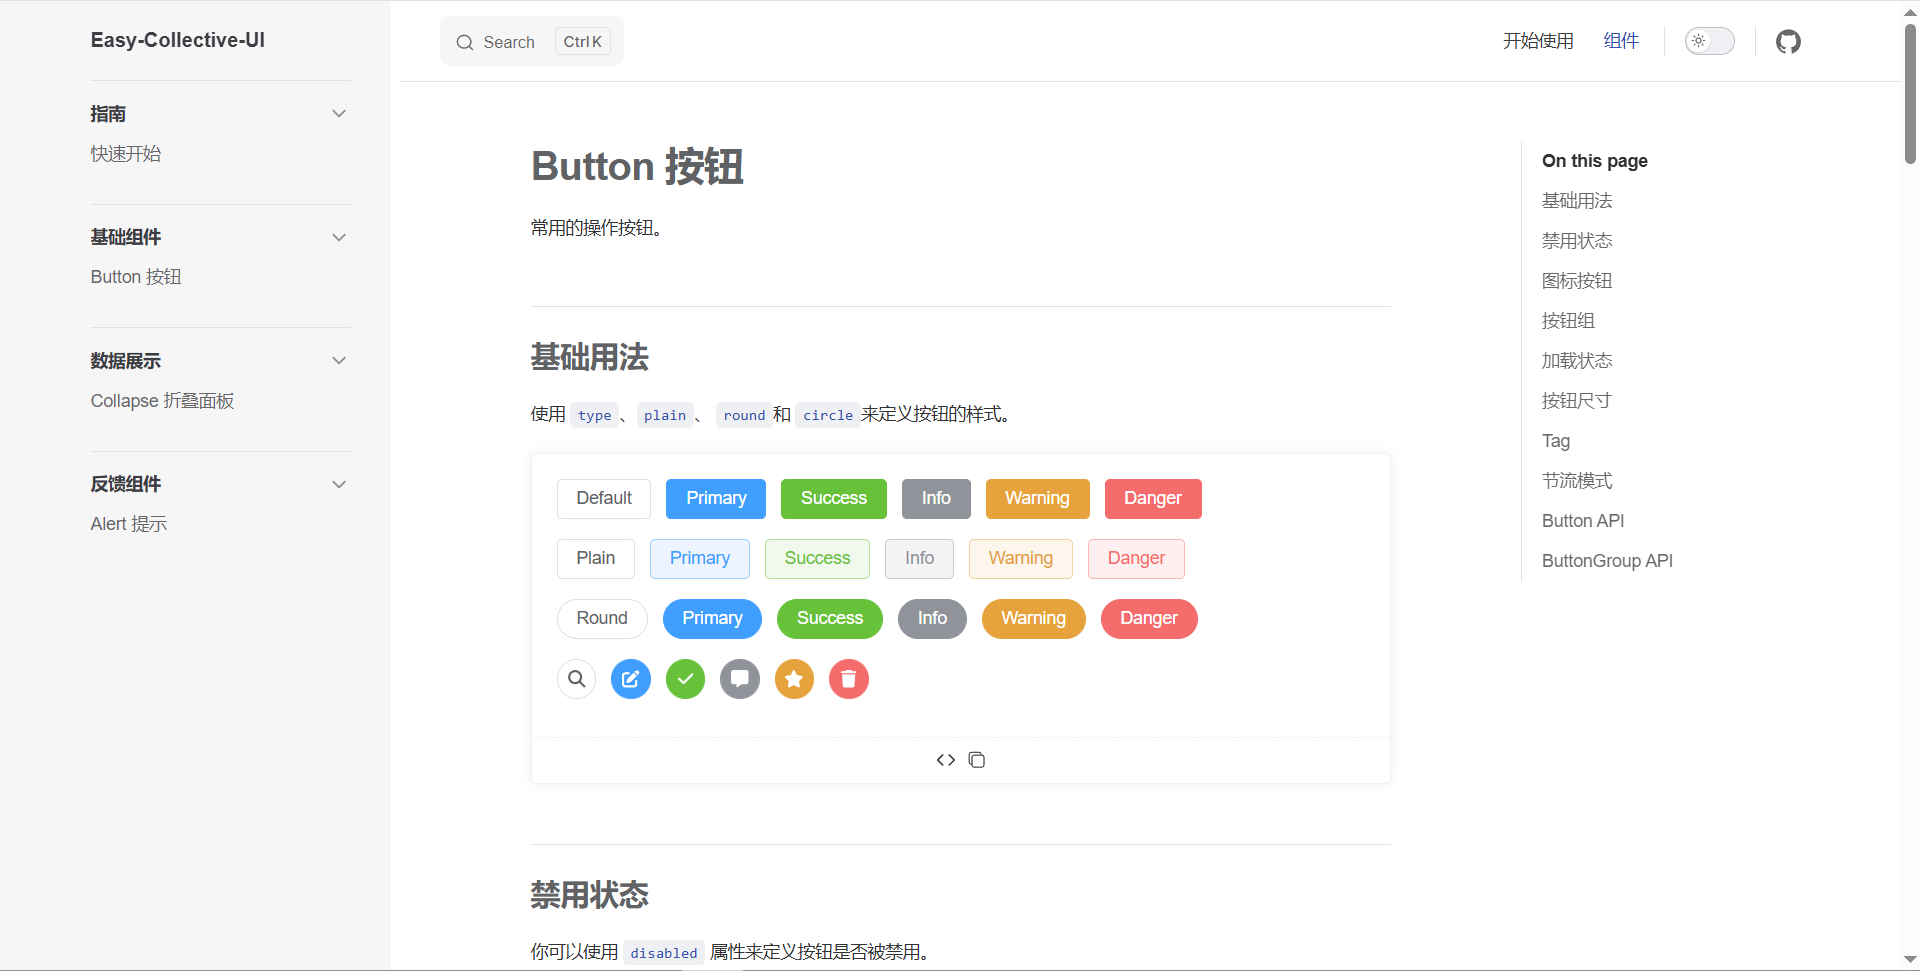
这里可以用storybook打包好的文档进行直接部署,也可用vitepress进行文档编写部署
这里我们采用vitepress以及@vitepress-demo-preview/component和@vitepress-demo-preview/plugin的插件进行文档的编写以及功能的预览
pnpm add @vitepress-demo-preview/component @vitepress-demo-preview/plugin修改 docs/.vitepress/config.ts 添加 markdown 配置:
import { defineConfig } from 'vitepress'
import { componentPreview, containerPreview } from '@vitepress-demo-preview/plugin'

// https://vitepress.dev/reference/site-config
export default defineConfig({
  title: "Easy-Collective-UI",
  description: "一款基于vue3的组件库",
  base:"/EasyCollectiveUI/",
  head: [["link", { rel: "icon", href: "favicon.png" }]],
  themeConfig: {
    // https://vitepress.dev/reference/default-theme-config
    nav: [
      { text: '开始使用', link: '/get-started' },
      { text: '组件', link: '/components/button' }
    ],
    search: {
      provider: 'local'
    },
    sidebar: [
      {
        text: '指南',
        collapsed: false,
        items: [
          { text: '快速开始', link: '/get-started' },
        ]
      },
      {
        text: "基础组件",
        collapsed: false,
        items: [
          { text: "Button 按钮", link: "components/button" }
        ],
      },
      {
        text: "数据展示",
        collapsed: false,
        items: [
          { text: "Collapse 折叠面板",link: "components/collapse" }
        ]
      },
      {
        text: "反馈组件",
        collapsed: false,
        items: [
          { text: "Alert 提示", link: "components/alert" }
        ]
      }
    ],

    socialLinks: [
      { icon: 'github', link: 'https://github.com/mzmm403/EasyCollectiveUI' }
    ],
    footer: {
        copyright:"Copyright © 2024-present Mzmm"
    }
  },
  markdown: {
    theme: {
      light: 'vitesse-light',
      dark: 'vitesse-dark'
    },
    lineNumbers: true,
    config:(md) => {
      md.use(componentPreview)
      md.use(containerPreview)
    }
  }
})
在 .vitepress 下新建目录 theme,并在 theme 目录中创建 index.ts
import type { App } from 'vue'
import { AntDesignContainer } from '@vitepress-demo-preview/component'
import DefaultTheme from 'vitepress/theme'
import EasyCollectivUI from 'easy-collective-ui';
import '@vitepress-demo-preview/component/dist/style.css'
import "easy-collective-ui/dist/index.css"

export default {
    ...DefaultTheme,
    enhanceApp({ app }: {app: App}) {
        app.component('demo-preview', AntDesignContainer)
        app.use(EasyCollectivUI)
    }
}
这样便完成了 @vitepress-demo-preview 的配置,接下来就可以在组件文档中编写demo了。 在 docs 目录下创建 demo 目录,该目录存放文档中编写的demo,如定义一个 button/Basic.vue 文件:
<template>
  <el-button type="primary">测试按钮</el-button>
</template>
在 docs/compnents/button.md 中使用该 Demo:
## 基础用法

基本用法

::: preview
demo-preview=../demo/button/Basic.vue
:::
最后的成品如下图:
这里有个约定就是图片这种静态资源放在根目录下的public文件夹下,这样在github CI/CD的时候才能正确访问到资源